For the next 5 days, you get 20% OFF Equip Prime Protein!!!
Use code MARIA20.
The code will work for 20% off 3 or more bags of Prime Protein (any flavors) between May 14th through May 18th (5 days).
Summer is coming which mean’s ice cream time!
Skip going to Dairy Queen for a blizzard and cut out over 900 calories and 47 grams of carbs by making my keto Reece’s Blizzard!
HOW TO MAKE A KETO REECE’S BLIZZARD
To make my keto Reece’s Blizzard, I used peanut butter Equip Prime Protein powder and the chocolate Equip prime protein!
I love Equip Prime Protein powder so much, I even pack a bag and an immersion blender with me when I travel! I am in LOVE with it!
It works great for making recipes like my protein-packed keto Reece’s Blizzard. I LOVE that I can enjoy a HUGE delicious Blizzard and not feel awful after eating it! In fact, I feel great afterwards!
Equip Prime protein does things right! They care about the health of their customers! The peanut butter Prime Protein powder is an all-natural, comes from 100% grass-fed beef protein powder with only only 3 ingredients: beef, peanut butter flour powder, salt, and stevia. No fillers, no additives, no chemicals and it is so delicious!
Doesn’t Heather look AMAZING? She lost 112 pounds in only 10 months!
“Its been a while since I posted a picture of my progress since getting a membership with Craig and Maria Emmerich 10 months ago.
Today as I walked into my place of work after having been to our local ymca pool for some exercise my boss encouraged me that I should post a picture of myself now since the last picture was back In December at Christmas.
I am so blessed to have had an opportunity to get help from Maria and Craig. They have helped me and my family tremendously!!
I started at 320 lbs and now 208lbs having lost approx 112lbs in 10 months. Words do my gratitude no justice because I was someone who fought being obesity my entire life. I still have some weight to lose but I am eternally grateful I do not live in the pain and agony my body was living with when I purchased their platinum membership.
If you feel like you can’t do it alone or your unsure of where to even start I encourage you to reach out to Maria Emmerich.
Craig and Maria are so encouraging, supportive, knowledgeable and compassionate. If your any thing like me you won’t regret.
Thank you Emmerich’s. You are the best! Abundantly Blessed” Heather
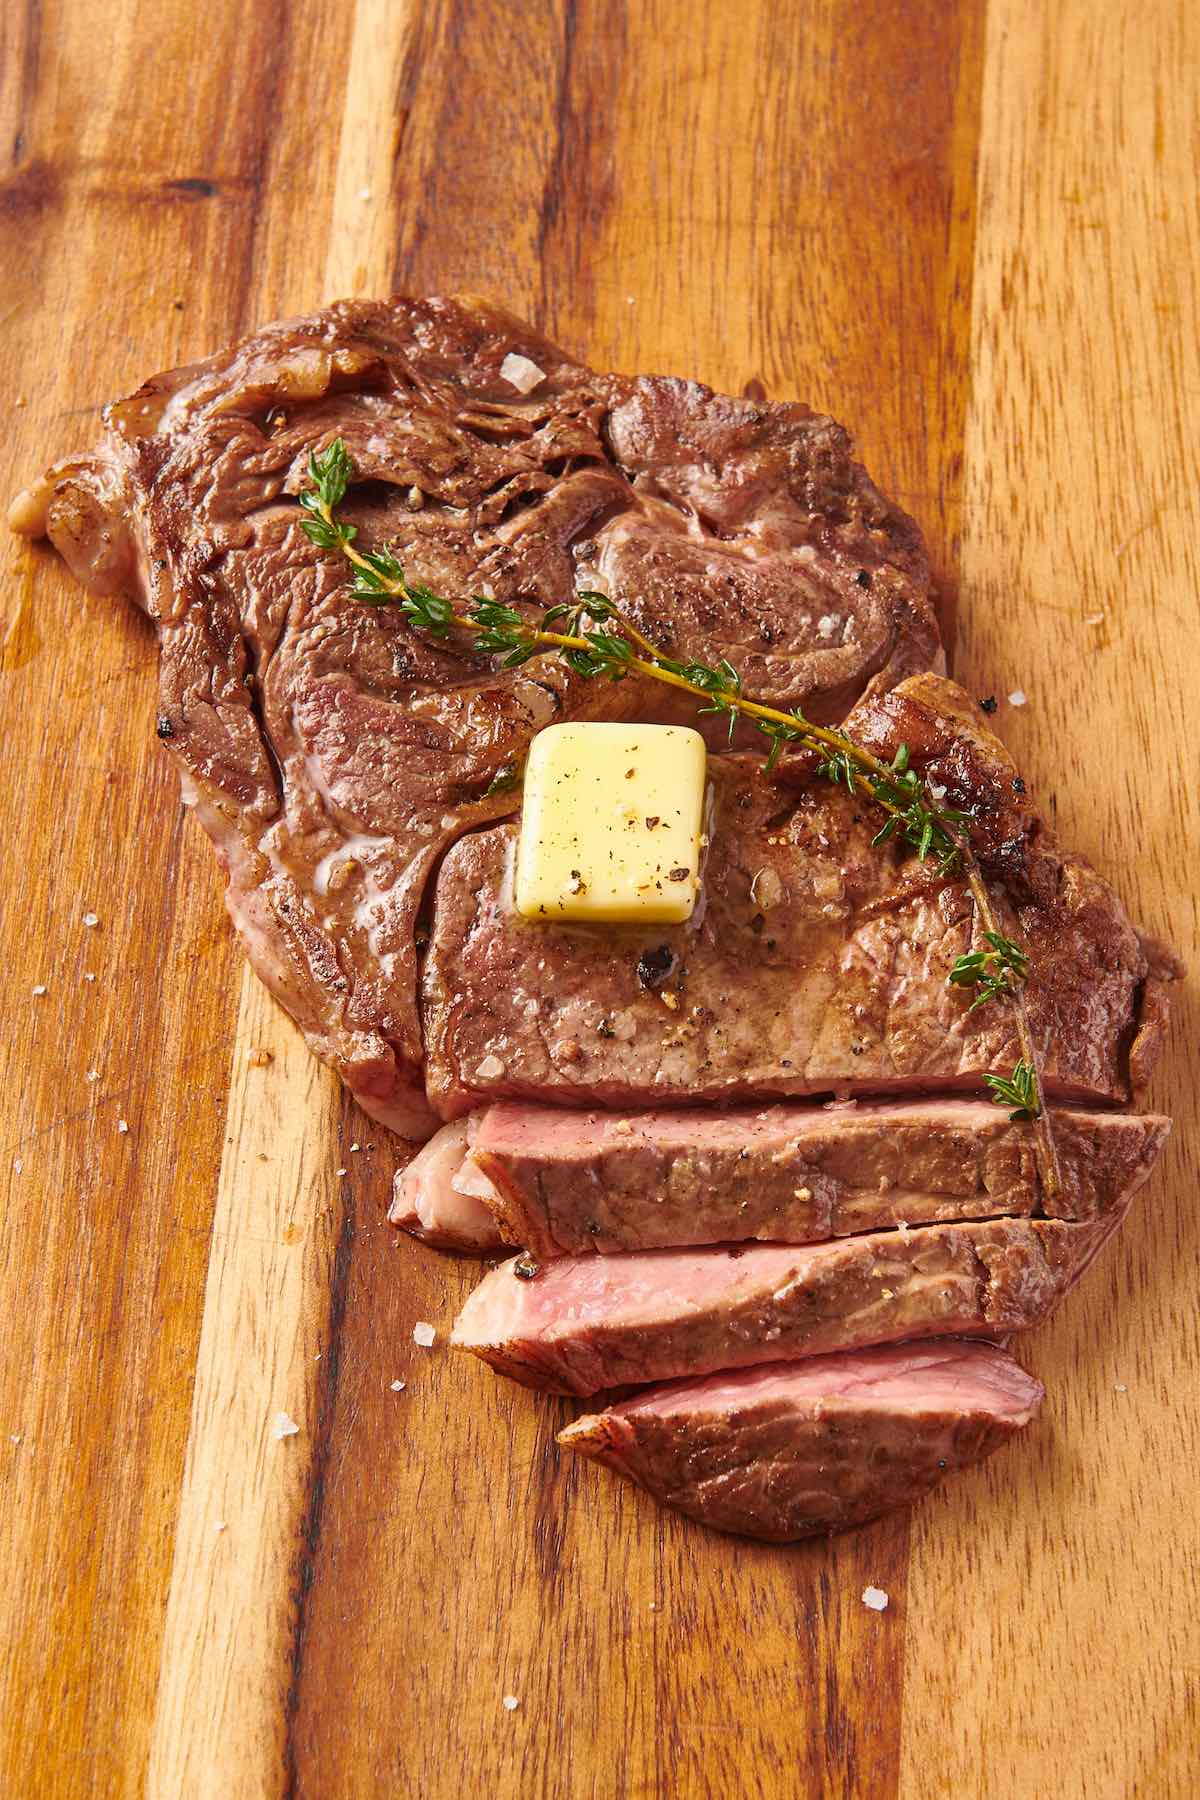
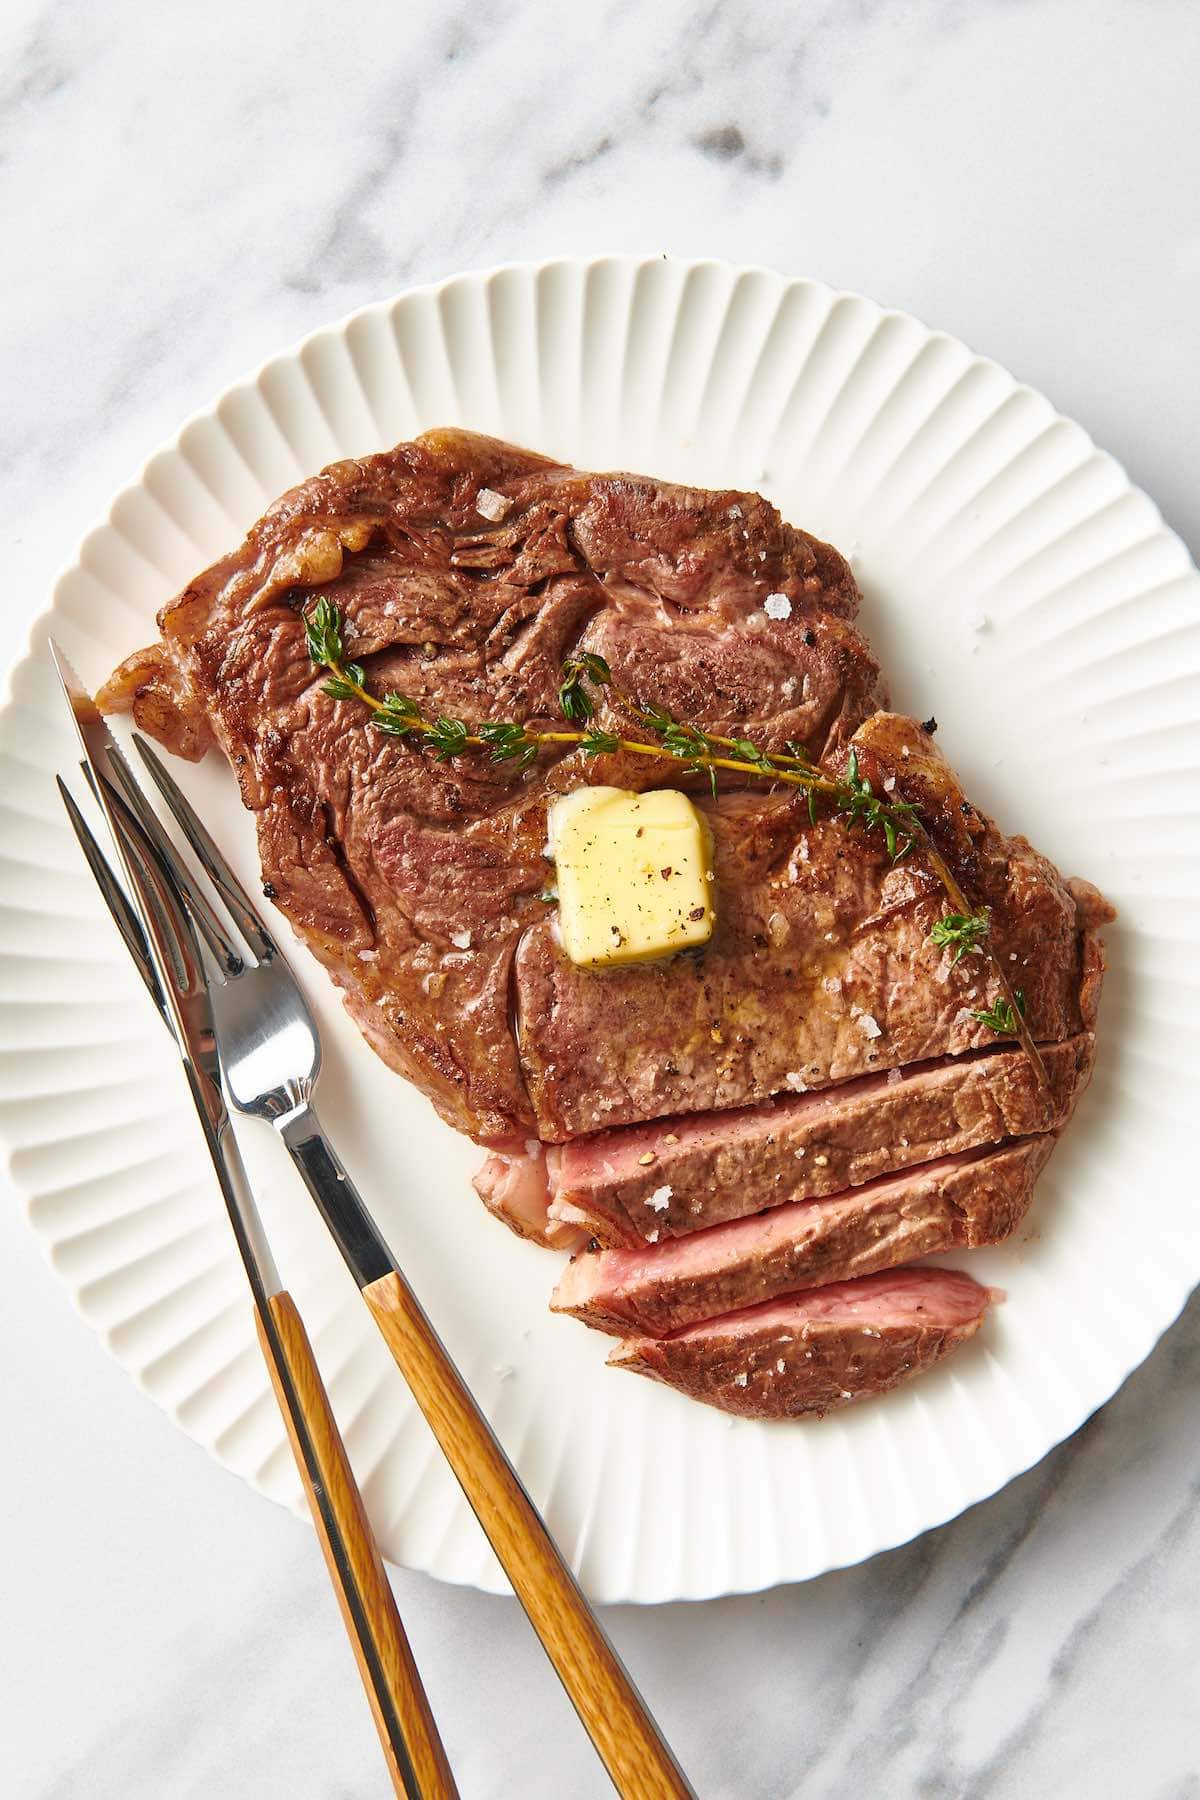
This recipe for perfectly cooked ribeye steak is kept simple on purpose since it’s the preparation of the steak that shines. With minimal effort and a handful of ingredients, you’re guaranteed to get mouthwatering, juicy steak every single time!
Perfectly cooked steak, in my opinion, is one of the best dinners there is. Ribeye steak is one of my favorite steaks to cook since it’s so versatile and naturally takes to all different cooking methods. My favorite ways to cook ribeye are sous vide, reverse seared, cast iron cooked, and pan-seared on the stovetop.
This recipe features thick-cut ribeyes cooked in butter, olive oil, garlic, and fresh herbs. The hot pan gives the steak a nice caramelized exterior, while the butter helps keep the interior tender and juicy.
What is ribeye steak?
Ribeye is a boneless rib steak coming from the cow’s rib section. Ribeye with the bone left in is referred to as “rib steak,” and a large rib steak with the bone exposed is a tomahawk steak.
Because ribeye is naturally marbled, it doesn’t need a lot of manipulation to be tender. Marinating or cooking low and slow isn’t necessary. Instead, ribeye is best prepared by cooking quickly over high heat. High heat helps melt the fat in the steak, which makes for a naturally earthy and buttery flavor.
Why this recipe works
Very little prep work. Similar to Denver steak and sirloin tip roast, very little extra work is needed. Just let the steak rest at room temperature, then throw it in the pan!
Simple ingredients. Meat, butter, garlic, and herbs are about everything that you’ll need.
Juicy and tender. After one bite, you’ll see why it’s such a sought-after cut. All of that marbling melts in your mouth, pairing perfectly with the garlic and herbs.
Great for special occasions. Ribeye may be a more expensive cut, but it’s definitely doable for special occasions where you don’t want to spend the whole night in the kitchen.
I love this steak because it’s so reliable. I know so long as there’s ribeye in the fridge, I can get a solid and hearty dinner on the table at a moment’s notice. Very few “extra” ingredients are needed to make this steak taste its best.
Ingredients needed
As I mentioned, no frills are needed to make a perfect cut of steak. Just a little garlic and fresh herbs make a big difference. Here’s what you’ll need:
Rib eye steaks. This recipe is for two steaks cut about 1 inch thick. Frozen steaks will work too. Just let them thaw overnight in the fridge.
Butter. Preferably unsalted so you can control how much salt gets added to the dish.
Olive oil. To help cook the steaks.
Fresh herbs. Thyme and rosemary. You can use fresh sage, marjoram, or oregano if you don’t have one or both.
Garlic. Smashed.
Salt and black pepper. Added to taste.
How to cook a ribeye steak
Ribeye does best on high heat for a short amount of time. I like to cook it on the stovetop since it’s easy to control the heat and helps give the steak a nice crust from the sear. Here’s how it’s done:
Step 1- Bring the steaks to room temperature
First, take the steaks out of the fridge and let them come to room temperature on the counter for 20-30 minutes.
Step 2- Season the steaks and make the garlic herb butter
Once the steaks are at room temp, season both sides generously with salt and black pepper.
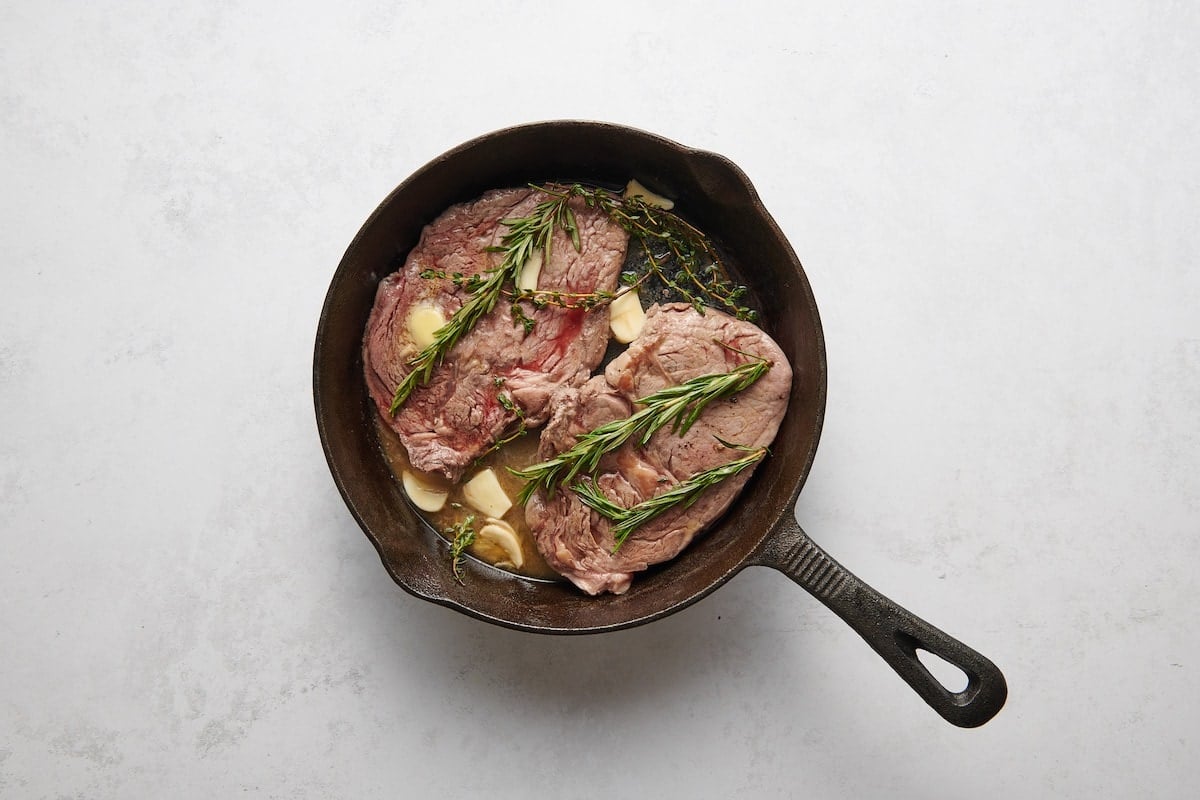
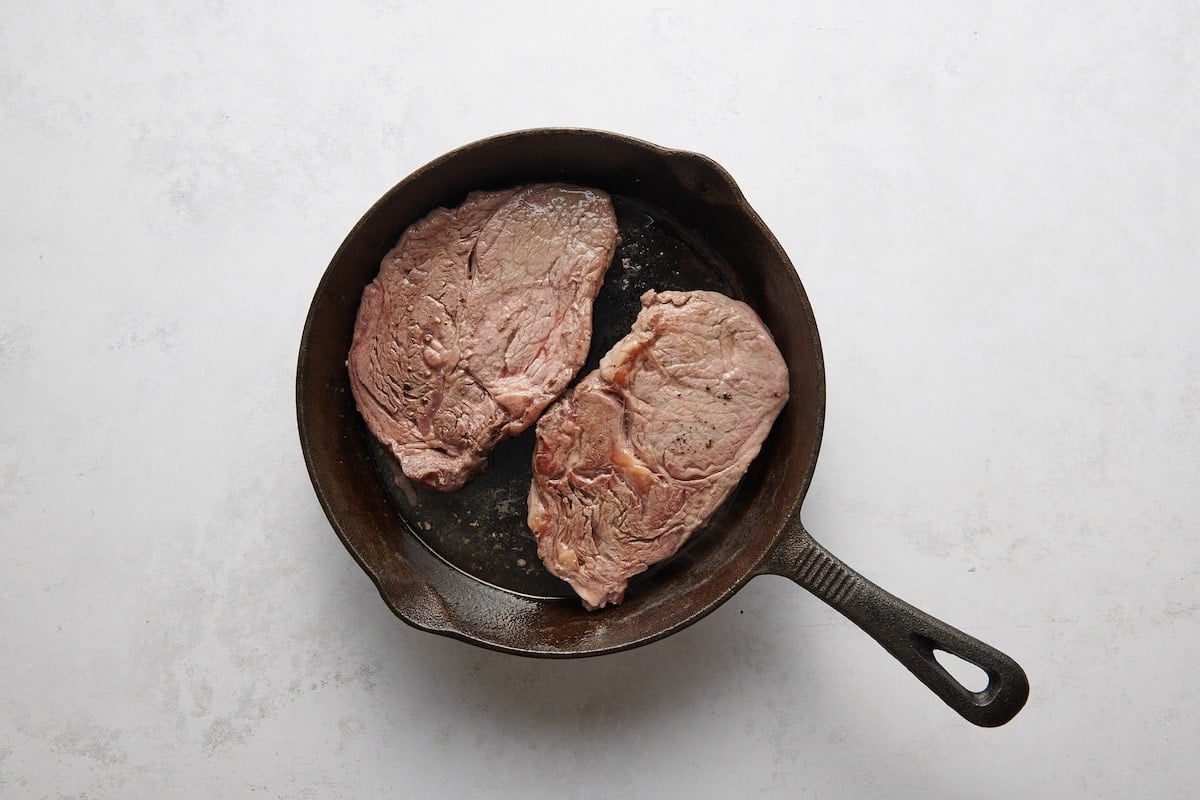
Then, add the butter and olive oil in a large skillet over medium-high heat. When the butter has melted, add the herbs and garlic.
Step 3- Cook the steaks
After adding the herbs and garlic, cook the steaks for 4-5 minutes on each side.
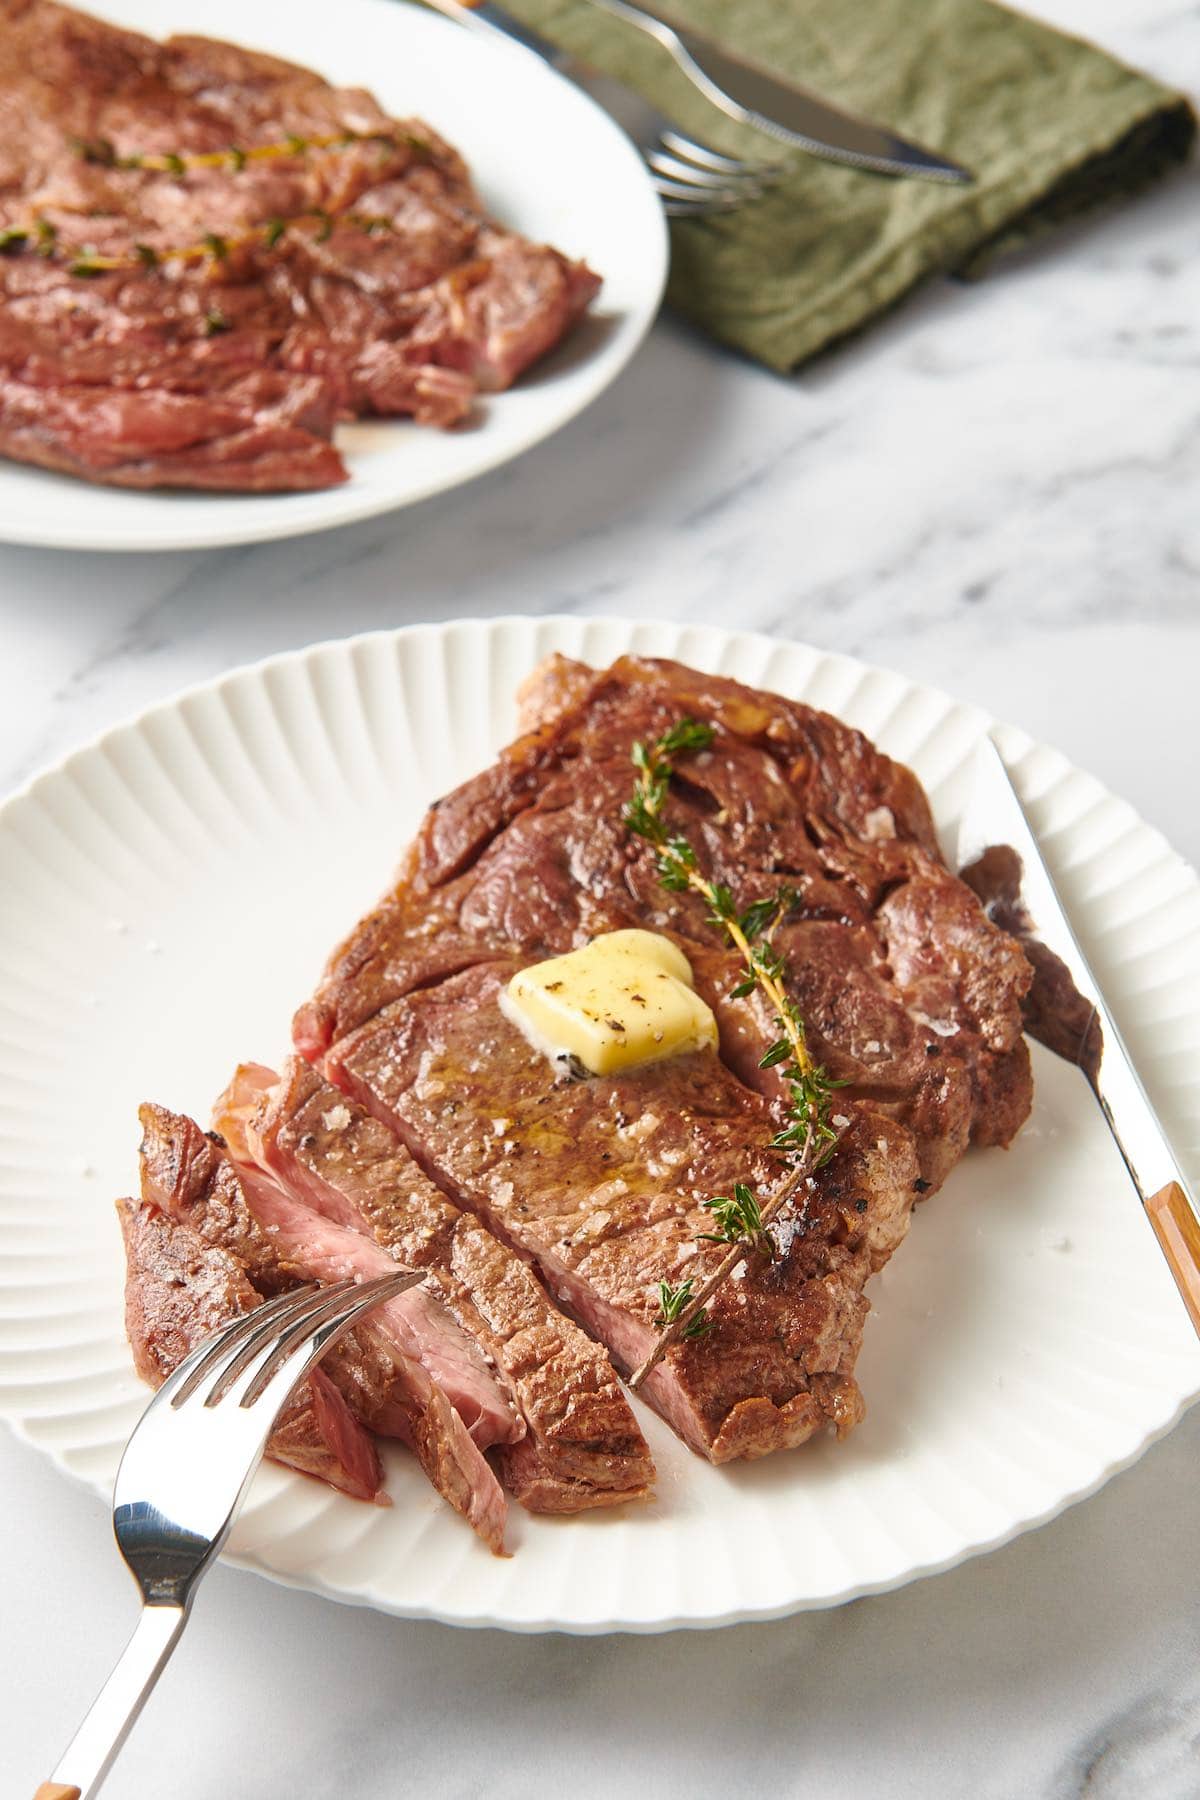
When the steaks reach an internal temperature of 130F for medium-rare or 140F for medium, use a pair of tongs to transfer the steaks to a cutting board or plate.
Step 4- Rest and serve
Next, tent the steaks with aluminum foil and let them rest for 5-10 minutes. Afterward, slice the rib eye steaks against the grain, serve, and enjoy!
Steak cooking times
Personally, I like cooking ribeye steaks to medium rare or medium. This way, you can enjoy the natural flavor of the steak.
Use these temperatures and a meat thermometer to reach your desired doneness:
Rare – 120ºF
Medium rare – 130ºF
Medium – 135ºF
Medium-well – 140ºF
Well-done – 150ºF
Remember there is some “carryover” heat that will continue to cook the steaks as they rest, so remove them from the heat when they’re 5 degrees away from your desired doneness.
Tips to make the best recipe
Use a cast iron skillet. To develop a nice sear on the outside of the steak.
Don’t skip the resting. It’s essential to help the steak soak up and retain its juices.
Use a dry seasoning blend. In place of the salt and pepper, try garlic salt or this taco seasoning instead.
What to serve with this recipe
There are no wrong answers when it comes to what to serve with your ribeye steaks. Here are a few of my favorite suggestions:
Storage instructions
To store: Store cooled steaks in an airtight container in the refrigerator for up to 3 days.
To freeze: Freeze the cooked and cooled steaks in an airtight container or freezer-safe bag and freeze for up to 6 months. Do not re-freeze steaks once thawed.
To reheat: Preheat the oven to 275F and reheat the steaks until the internal temperature reads 130F using a meat thermometer.
More steak recipes to try
Frequently asked questions
What is ribeye steak best for?
Ribeye is the perfect steak for pan-searing since it cooks quickly, and the high heat helps melt the fat to make a tender steak. My other favorite method is to cook ribeye on the grill.
Is ribeye a good cut?
Ribeye is one of the best cuts of steak for its natural marbling and rich flavor.
How long does it take to cook a ribeye steak?
The exact time needed to cook ribeye will depend on the thickness of the steak and your preferred level of doneness. Generally, 10-15 minutes on the stovetop should do the trick for cooking 1-inch steaks to medium rare.
Take the rib eye steaks out of the fridge and let them come to room temperature for about 30 minutes.
Season both sides of the steaks generously with salt and black pepper.
In a large skillet over medium-high heat, add the butter and olive oil. Once the butter is melted and starts to sizzle, add the thyme, rosemary, and smashed garlic cloves to the skillet.
Add the rib eye steaks to the skillet and cook for about 4-5 minutes on each side, or until a crust forms on the outside and the internal temperature of the steaks reaches 130°F for medium-rare or 140°F for medium.
Remove the steaks from the skillet and place them on a cutting board or plate.
Tent the steaks with aluminum foil and let them rest for about 5-10 minutes to allow the juices to redistribute.
Slice against the grain and serve.
TO STORE: Store cooled steaks in an airtight container in the refrigerator for up to 3 days. TO FREEZE: Freeze the cooked and cooled steaks in an airtight container or freezer-safe bag and freeze for up to 6 months. Do not re-freeze steaks once thawed.TO REHEAT: Preheat the oven to 275F and reheat the steaks until the internal temperature reads 130F using a meat thermometer.
Disclosure: This post may contain affiliate links. I may earn a small commission for my endorsement, recommendation, testimonial, and/or link to any products or services from this website.
Many of you know I worked at a coffee shop since I was 15 years old. At this cute coffee shop, I would make the best lemon poppy seed muffins with delicious lemon curd dolloped on top! Before school, I would go to the coffee shop to make the scones and the muffins and then after school, I would go back to work. At the end of the day, I got to bring home the cinnamon rolls, scones and lemon poppy seed muffins that didn’t sell! So guess what??? I would make lemon poppy seed muffins to make sure I had some to go home with! No wonder why I was so unhealthy and overweight! Once I was diagnosed with PCOS, I decided to create healthy keto recipes of my favorite things like this protein sparing lemon poppy seed angel food cake!
My recipe for protein sparing angel food cake is only 42 calories and 1 gram total carb per slice compared to the whopping 700 calories and 97 grams of carbohydrates that my lemon poppy seed muffin had!
Here is my before photo when I was eating too many lemon poppy seed muffins and this is my after photo. Protein sparing modified fasting helped me get to my goal weight.
My sugar free kids love this lemon poppy seed angel food cake so much!
HOW TO MAKE PROTEIN SPARING ANGEL FOOD CAKE
To make this protein sparing Angel Food Cake, I used a stand mixer! I adore my stand mixer and it was my favorite foodie gift! Find my FAVORITE stand mixer HERE (makes a GREAT gift!)
Further Food gelatin and collagen peptides are both excellent sources of collagen. Both their Collagen & Gelatin are sourced from the highest quality, grass-fed, pasture-raised, hormone-free, and antibiotic free bovine collagen.
The benefits of collagen and gelatin are astounding! Just eating my delicious Protein Sparing Bagels helps support skin elasticity & hydration, longer hair & nails, stronger bones & joints, faster recovery between workouts, increased flexibility, improved digestion, and it even keeps you feeling full and satiated for longer!
Further Food Collagen Peptides dissolve instantly in any recipe, and Gelatin Powder naturally thickens recipes. It’s perfect for making my protein sparing angel food cake; it gives it a chewy bread texture! It also makes dairy free ice cream, jello, sugar free gummies, no bake cheesecake, or panna cotta!
Use code MARIAMINDBODY is for 20% off site-wide !
Click HERE to learn more about Protein Sparing Modified Fasting.
Lemon Poppy Seed Protein Sparing Angel Food Cake
Maria Emmerich
Prep Time 10mins
Cook Time 45mins
Total Time 55mins
Course Dessert, Nut Free, PSMF Recipes
Cuisine American
Servings 12servings
Calories 153
LEMON CURD:
Preheat oven to 350 degrees F (175 degrees C). NOTE: If using allulose, bake at 325 degrees F.
Sift protein powder, poppy seeds, sweetener and Further Food gelatin together and set aside.
In a large clean bowl, whip egg whites with a pinch of salt until foamy (save the yolks for “healthified” creme brule, “healthified” coconut custard, OR “healthified” ice cream).
Add cream of tartar and continue to beat until very stiff (you will be able to put bowl upside down and the whites won’t fall out).
Add your favorite extract flavor.
Gently fold in the protein powder mixture.
Pour into a greased 10 inch tube pan. Bake at 350 degrees F (175 degrees C) for 45 minutes.
Allow to cool while you make the lemon curd.
Combine allulose, lemon juice, 4 eggs and lemon zest in heavy medium saucepan and whisk to blend; add coconut oil. Whisk constantly over medium heat until mixture thickens and coats back of spoon thickly (do not boil), about 5 minutes.
Pour mixture through strainer into medium bowl. Place bowl in larger bowl filled with ice water and whisk occasionally until lemon curd is cooled completely, about 15 minutes.
Can be made 1 day ahead.
To serve, place one slice of protein sparing angel food cake onto a plate and top with a few tablespoons of lemon curd.
Nutritional Information: FOR CAKE ONLY 42 calories, 0.1g fat, 8g protein, 1g carbs, 1g fiber P:E ratio 80
“Before: Age 48 Weight: 182 Size: 12 BMI: 30.9 Body Fat%: 38.8 IBS, Migraines, sleep issues, lower energy, sugar/carb addiction
Current: Age 48 Weight: 133.8 Size: 4/6 BMI: 22.3 Body Fat%: 25.6
IBS nearly gone, No migraines for several months even during my periods, sleeping better, high energy, sugar free since December 23, 2020 (my last cheat day)
Maria and Craig Emmerich, thank you for your continual education, influence, and support. I am completely in love with this way of eating and am determined to impact as many lives as I possibly can moving forward! I appreciate the two of you for paving the way for me.” – Casey
Most people I consult are doing keto totally wrong. Get fast results with the my NEW Keto Packages!
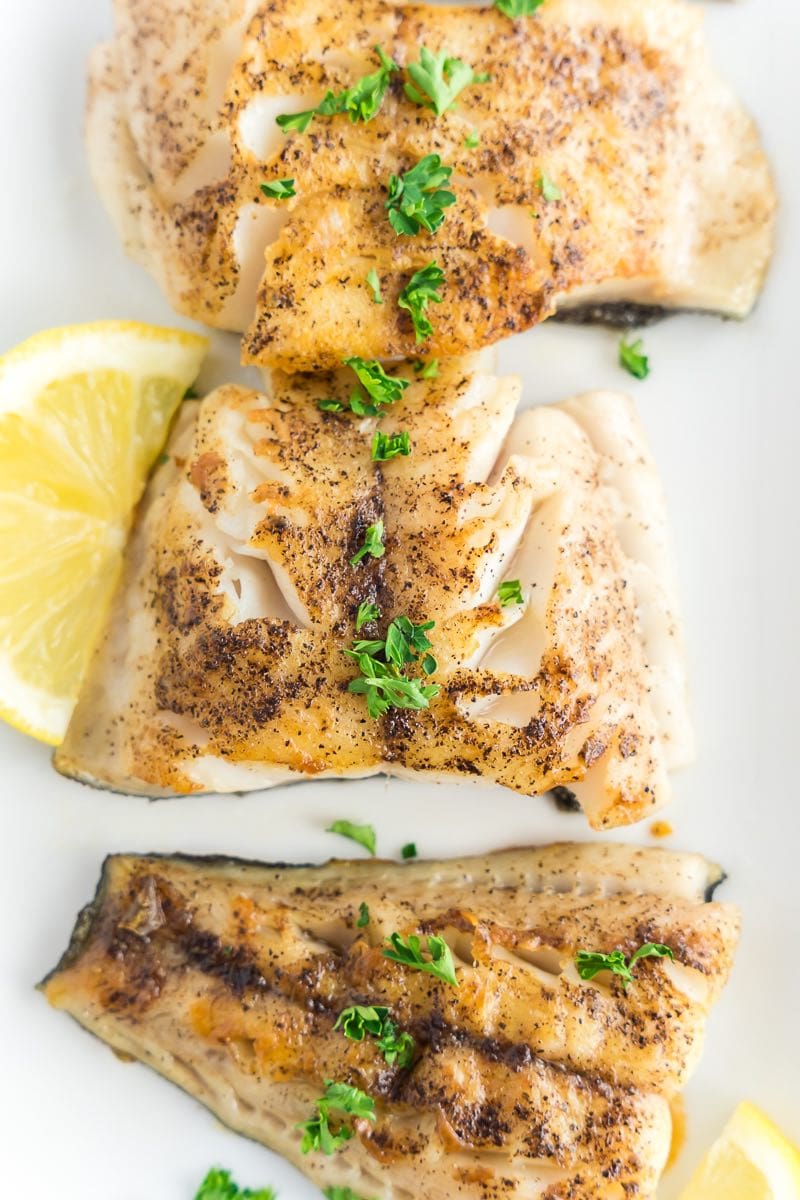
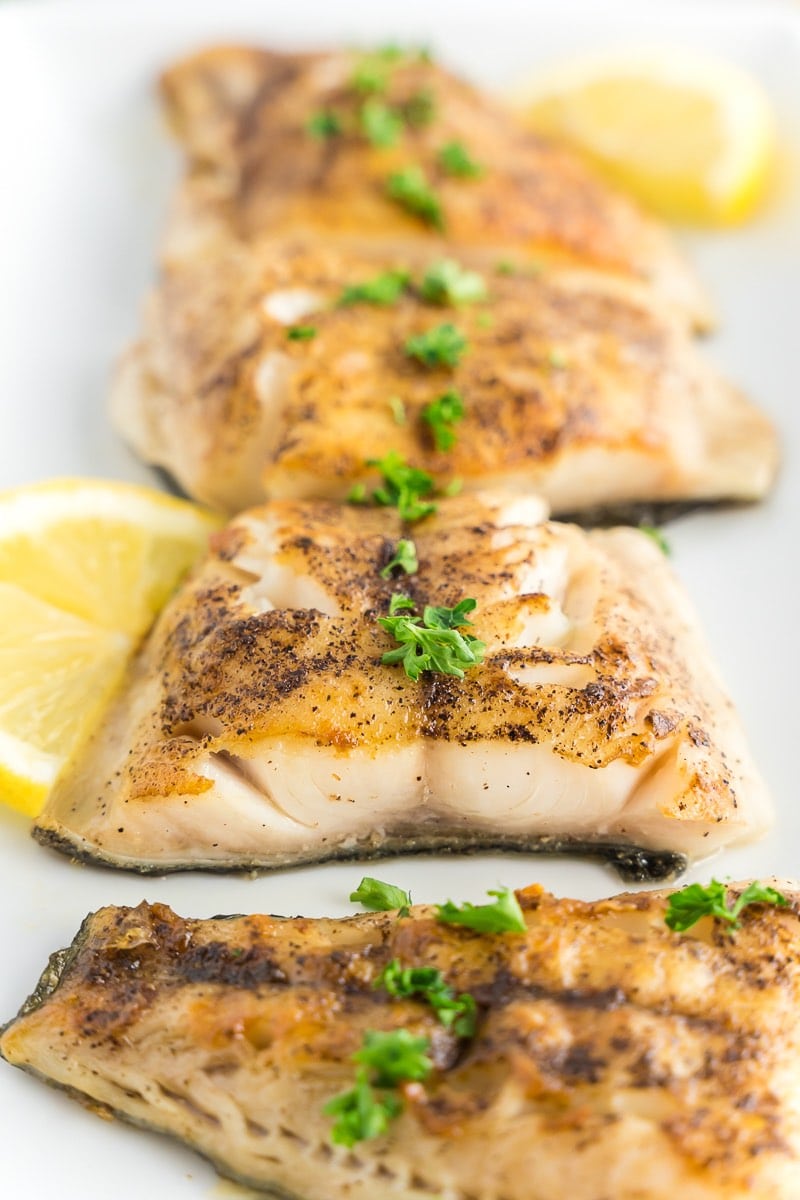
Grilled grouper is a quick and easy seafood recipe that takes less than 10 minutes to make! Pair it with your favorite sides for a healthy and filling meal.
We enjoy seafood and fish at least once or twice a week. We have a few favorites on rotation depending on the season and what is available. These include haddock, Chilean sea bass, and grouper.
Grouper is a saltwater fish commonly found around the Gulf of Mexico and the Caribbean. The taste of fish varies depending on its habitat. Some are mild tasting, whereas others can have a more flavorful kick. The most common way to cook grouper is by frying or grilling it.
Why this recipe works
As grouper is mildly flavored, the best way to eat it is to use minimal seasonings. While baking or frying the fish is delicious, the best way to eat it is to grill it! As someone who can sometimes be wary of some seafood tasting too ‘fishy’, grouper has proved to be a delicious fish to include regularly!
Here are some reasons why this grouper recipe will be a grilling favorite-
It’s quick and easy to make, taking less than 8 minutes all up.
Grouper is easily found at most fishmongers, grocery stores, and markets.
It’s a healthy fish containing important vitamins, like vitamin B-complex, vitamin D, magnesium, and potassium.
You can flavor or season it any way you like!
How to grill grouper
While you can bake this fish, the grilling method adds a delicious smoky taste to the fish. Once you prep everything you need, the cooking process is an absolute breeze!
The Ingredients
Grouper fillets- Choose fillets that are similar in size so that they cook evenly.
Olive oil- Any neutral flavored oil works.
Salt and pepper- To season.
Lemons and parsley- To serve.
The Instructions
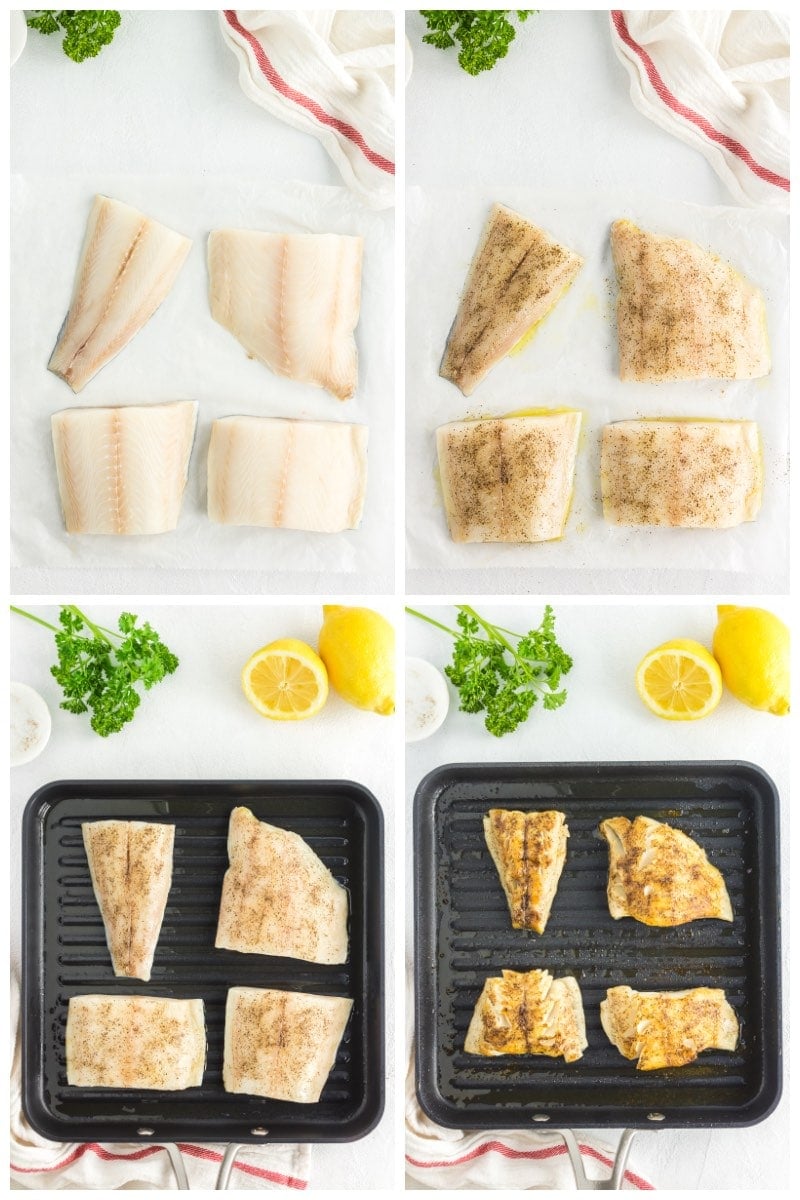
Start by pat drying the fish to remove excess liquid. Rub olive oil on both sides of the fish and sprinkle some salt and pepper.
Next, heat the grill and brush the surface with some oil. Add fish to the hot grill and cook for 2-3 minutes, before flipping, then cooking for another 2 minutes.
Remove the fish from the grill, squeeze some lemon on top, and serve immediately.
Grouper vs. snapper
Grouper differs from snapper as it has a distinctive and mild flavor. The flesh is lean, moist, and firm. Snapper has white flesh and red skin, giving it a slightly pink texture. It has a mild taste but a prominent sweeter flavor.
Tips for success
When choosing your grouper, look for firm and moist flesh, and avoid fish with a strong fishy odor or an overly white color.
Avoid overcooking the fish, as it can become quite rubbery and dry. Once it starts to flake, the fish is ready to serve.
If pan-grilling the fish, always use a non-stick pan or skillet. This will prevent the fish from sticking to it.
Flavor variations
The beauty of grouper recipes is that because they are mild tasting, they can be flavored in a plethora of ways. Here are some ideas:
Cajun. Season the grouper with cajun spices, such as paprika, cayenne pepper, and thyme, or even a pre-made Cajun seasoning.
Pat down the grouper with a paper towel to ensure there is no excess liquid.
Generously rub both sides of the fish with olive oil. Sprinkle the salt and pepper.
Heat the grill to medium/high and ensure the grill is clean. Brush more oil over the top.
Add the grouper and cook for 2-3 minutes, or until the sides go slightly opaque. Flip the fish and cook for a further 3 minutes.
Remove the fish from the grill and sprinkle with parsley and lemon.
TO STORE: Leftovers can be stored in the refrigerator, covered, for up to three days. TO FREEZE: Place the cooked and cooled grouper in a shallow container and store it in the freezer for up to two months. TO REHEAT: Reheat on the grill or oven.
Disclosure: This post may contain affiliate links. I may earn a small commission for my endorsement, recommendation, testimonial, and/or link to any products or services from this website.